Baby, it may be cold outside...⛄⛄⛄
But, thanks to the skill and knowledge of my hubby, it is SO much warmer inside these days! 🔥😌🔥😌🔥
In the past weeks, he has taken us from this woodstove sitting on our porch (awaiting someone stronger than I to help him carry it in! LOL)...
To this beautiful, heartwarming picture!
 |
| Warm Fire |
How did we get from there? I am so glad you asked!!
Because he did all of the work 🔨🔨, this post is only possible due to the expertise of my hubby! He had to write down all that he did, every step of the way.
Now, don't get me wrong! I did help! I handed him whatever he needed, and took all of the pictures 📷
**Before I get started, I want to make sure that I add the following disclaimers:
- This post is how we installed our woodstove. It is not meant for suggestions, requirements, or as a tutorial for your own installation.
- Please consult the National Fire Prevention Association's website (https://www.nfpa.org) for codes and requirements for woodstove installation.
- Also, Purdue University Extension Office has very useful information for residential woodstove installation. Please visit their website (https://www.extension.purdue.edu) for more information.
- Always, always... Refer to the codes and requirements for your area!
So, now we can begin!
First, we had to put something down first to protect the floor from any heat damage. We chose to use pavers that we already had on hand.
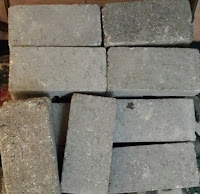 |
| Pavers for our Base |
Pavers are not recommended by ghe NFPA because they can transfer heat.
However, our woodstove has a heat shield on the bottom. The heat shield reduces the heat to the floor.
Next, we worked on protecting the wall...
The recommendation for a back shield is to have it spaced 1" from the wall to allow for air flow. These little 1" square spacers seem to do the job nicely.
 |
| NFPA recommends 1" spacing for the back shield |
But, where do you get them, you ask? Good question! ❓❓❓ He was able to cut them down from a leg from a broken grill. He had disposed of the old grill, but kept the legs because they looked like they could be useful. Good thinking! 🤔💡🤔
 |
Leg from old grill was repurposed to make about 12 spacers
for our 4' x 8' corrugated steel panel |
The corrugated steel panel was then attached to the spacers on the wall,...
 |
Corrugated steel panel makes a good
heat shield for our woodstove |
But not before making sure the bottom gap was the correct spacing, also.
 |
Installing back heat shield, using the pavers as spacing for the
bottom gap (min. is 1 1/2", our pavers are 2") |
Once the steel back shield was firmly attached to the wall, the pavers were moved to their correct position to allow air flow behind the shield.
 |
Pavers moved out to allow air flow behind
the shield. Cord for blower on woodstove. |
Now, on through the wall, and beyond! A hole was cut in the wall to allow the "thimble" to fit snugly in place.
I am learning all kinds of new terms with this project! 📓📝📓
 |
Installation of certified "thimble". Rag was just to
block the cold air from outside! |
The hubby then climbeded up on a ladder, and attached the stovepipe on the outside of the house.
 |
| Insulated stovepipe. |
One last step...He then connected the "thimble" and woodstove together with single-wall insulated stovepipe.
 |
Single-wall stovepipe connecting to insulated
stovepipe before going through the "thimble" |
Loaded it up with wood, and lit that baby up! 🔥🔥🔥
When it looks like this outside...
But, we are rocking temperatures like this inside...
Makes it all worth it!
It doesn't hurt either when someone gives you a full truckbed of firewood for only $20!
What a great way to keep warm and toasty!!!!


